How to refret a guitar
Eventually the frets on any guitar that is getting any use will need replacing. You don’t normally need to refret a guitar until it’s had several level and re-crown services and the fret tops are so low that they cannot be crowned any more.
When this happens the intonation of every note you fret will be out because the width of the apex of the fret is too great. In the case of this guitar (1977/8 Fender Strat neck) the frets were so thin that the integrity of the fret was almost lost. They were almost like thick aluminium foil strips!
When frets have been left to get in this state it’s difficult to remove them but with a little care, patience and a good quality professional fret puller it is possible to remove frets with little or no chipping of the board.
The frets had been hammered or press fitted at the factory with no glue used and the board is a 7.25” radius. If I was going to refret a guitar where glue had been used I would have used a soldering iron to heat up the frets slightly. This gets the glue to release and makes the frets easier to pull.
When you get one of the frets out it is possible to measure the Tang. The Tang is the part of the fret that sits down into the slots. When you refret a guitar you need to know the Tang’s height and width.
In this case it was 1.6mm x 0.5mm. I sourced some authentic, vintage Fender frets that had been pre-radiused to 7.25” which came in a pack of 24. They had a fret width of just over 2mm, a perfect replacement with just over 1mm of height. It’s a great time saver not having to bend the frets to a radius when you refret a guitar.
Once the frets are out, the slots need cleaning. I used a razor blade, a fret slot cleaning knife and a Refret Saw to thoroughly clean out the fret slots to the required depth (checking with a depth gauge), so as to get good contact with the tang and the bottom of the fret slots.
I also took a round needle file and very slightly opened the top of the slot to ease the fitting of the new frets. Here’s the neck with all the frets removed.
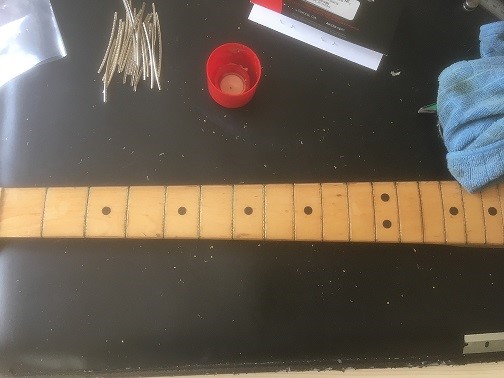
Once you’ve got the slots cleaned out, the next thing you need to do is cut the new frets to size for their respective slots. Making a fret caddy (as seen in the picture), cutting the frets to size then putting them in the corresponding holes saves time when you refret a guitar. The frets should be cut about 1/8” proud either side of the board.
It’s important to check the neck is dead straight with a straight edge (you’ll need a notched straight edge too) this ensures you’re not creating a back bow when you hammer in the frets.
Also, as you can see from the pic, I put the first three frets in then used a fret rocker to check that the 2nd fret had gone in level with the 1st and 3rd. We were off to a good start. A visual check that the frets are sitting down to the board across their width is all that’s really needed.

Gently tap one end of the fret in and work your way across the fret. Confident hits with the hammer square on to the fret. Don’t take a huge back swing!
Using the nylon side of the hammer is fine and probably to be recommended on the edges of the fret. It’s a lot quieter too. Remember to look after your ears when you refret a guitar.
Check the straightness of the neck regularly as you go.

And check the frets with a fret rocker to check for any high spots too
As I wanted to make sure there was good contact across the width of each fret I stopped after 11 and dripped a small amount of water thin super glue down into the fret ends on both sides.
This finds any tiny voids and fills them and makes sure the frets won’t lift over time. You can check frets are making good contact by using a bone nut or 2mm guitar pick or similar.
Tap the fret at the edges and across the width. It should sound solid and ‘ring’. You’ll soon hear a badly seated part.
Sometimes when you refret a guitar (especially with 7.25” radius fret boards) they might not seat properly or lift a little at the fret edges. The super glue will go off in seconds and guarantee no lifting.

Once you’re happy with progress on the first 11 frets, the other 10 frets can be installed; checking with a fret rocker and straight edge as we go. Putting a spot of water thin super glue down each slot

When they’re all inserted, the fret ends need to be nipped off as close to the edge of the board as possible. The ends have a bevel of 30-35 degrees put on them.
Don’t go wild with the bevel as the strings might be close to the edge and you could create a playing problem for the 1st and 6th string ‘falling’ off the edge. Fret edges need to be shaped, filed and sanded to make them comfortable to play. When we say shredding we don’t mean your fingers!
Next, perform a very light level and crown and, using a radius block, check that there is still a 7.25” radius on the length of the board. Then polish the frets up to a mirror finish.
In the case of this Fender, the nut had been slotted down over time as the old frets wore. I needed to either replace the nut or (as in this case) rescue and rebuild/reslot it. This is quite common when you refret a guitar.
I needed to marry the body and neck back together and put strings on at tension before I wasable to reset the truss rod first and do the slotting.

When you refret a guitar it’s a good idea, as the final action, to play every note on the board to check its tone and sustain just in case any are still loose or need seating. If you’ve used the glue trick this shouldn’t be a problem.
Setup, in this case with a set of 9-42 strings, it played and sounded great.
For information on BBZ guitar refret services in High Wycombe and Buckinghamshire click here.
Follow us on Facebook or Twitter for news and offers from BBZGuitars. If you’ve got any other questions about how to refret a guitar or anything else for that matter, why not apply to join the BBZ Guitar Fix Group on Facebook and pose your questions in the group.